
Using Netlify Forms with Nuxt.js

On a recent side project, I decided to try out Netlify for hosting. Seemed pretty straightforward, plus they had some cool features like Forms that I wanted to take advantage of, so I figured why not. Well, turns out, implementing said Forms feature was not easy as I had hoped. After doing a lot of digging around on the internet, it seems others have struggled with this as well, so I decided to make a post showing what I did to get it all working.
Static Site
For starters, the project I’m working on is a static site built with Nuxt.js.
nuxt.config.js:
export default {
  target: 'static',

  ...
  }
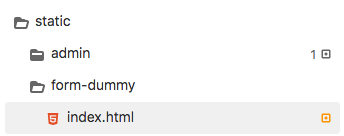
Form-Dummy
For this to work correctly with Netlify Forms, you need to set up a form dummy. In your Static directory, create a new directory called form-dummy and within that directory create a new index.html file.
My form-dummy is as follows:
<form name="contact-form" action="/contact/thankyou/" data-netlify="true" data-netlify-honeypot="bot-field" hidden>
  <input type="text" name="name" />
  <input type="email" name="email" />
  <textarea name="message"></textarea>
</form>
Your’s may differ depending on what you want your form to do, but for this example, most of the important parts are in that first line. Some things to know:
- the name in the form-dummy must match the name in your real form
- if you have an action in your real form, you must define that in the form-dummy too
The Real Form
Once you have your form-dummy all setup, you can create the actual form. For example, mine looks similar to this:
<template>
  <section>
      <div>
        <form
          name="contact-form"
          method="post"
          action="/contact/thankyou/"
          data-netlify="true"
          data-netlify-honeypot="bot-field"
        >
          <div>
            <input type="hidden" name="form-name" value="contact-form" />
            <div>
              <input
                for="name"
                type="text"
                name="name"
                required
                placeholder="Name"
              />
            </div>
            <div>
              <input
                type="email"
                name="email"
                required
                placeholder="Email"
              />
            </div>
            <div>
              <textarea
                name="message"
                required
                placeholder="Message"
              ></textarea>
            </div>
            <div>
              <button
                type="submit"
                value="Send message"
              >
                Submit
              </button>
            </div>
          </div>
        </form>
      </div>
  </section>
</template>
Note how lines 4 though 10 match the form-dummy almost exactly, this is important.
Success Page
When using Netlify forms, when the user submits the form, you have the option of using their standard success page, or you can redirect to your own page. If you want to redirect to your own success page, you need to define the method and action:
method="post"
action="/contact/thankyou/"
Note, your action path will be different, replace that with the path to your success page.
This is where I ran into trouble. When running locally, everything worked as it should, the user submits the form, then gets directed to my thank you page. But every time I deployed the site, the same exact workflow would direct the user to the standard Nelify success page, super irritating. Unfortunately, the pain was self-inflicted. I had forgotten to place the action in my form-dummy. Once I did that, everything worked perfectly.
Hopefully, this brief overview is helpful. Check out my implementation in action over here livefortrails.com/contact/us/. Also, be sure to check out the official docs as they go over this in more detail (docs.netlify.com).
-mj